Hentai Caveman Guide
Hentai Caveman 1.0 Walkthrough — All Puzzles and Endings Guide
Full 1.0 route — four girl rescues, fruit offerings, labyrinth and volcano puzzles, ending and extras.
Last updated: October 19, 2026
Start Here
Quick answer: Ceremony → second DUDUNGA offering → FIRE rescue → KAMONGA → SLINGSHOT rescue → DRUM rescue → BANONA → north tunnel right exit → volcano guard/helper → final R interaction.
If I am simply asking "where do I go next?", I start with the sections below on this Hentai Caveman hub page.
This is my Hentai Caveman 1.0 clear — four girls, three fruit offerings, guard-and-helper puzzles everywhere. The game looks like a silly caveman RPG; the map checks are strict. Route below is what I actually ran; if your tile math differs, tell me.
Rescue-first walkthrough (soft-lock warnings): Guide to save the four girls.
Completion logic: Offerings (fruit to the elder) and rescues (tool + boss contact) are separate flags. You need all four rescues and the three post-ceremony offerings (DUDUNGA, KAMONGA, BANONA) before the northern tunnel opens properly.
Map legend: teal letters = destinations; red X = lethal chests, holes, or fixed attack tiles. Coordinates are (x,y) from the upper-left, north = up.
Controls and menus
| On screen | What it does |
|---|---|
| UKUNGA | New game (title) |
| KOTANGA | Continue / retry from save |
| UGA UGA | Exit title; return to title from normal pause |
| MONGA | Yes / accept |
| UGUGU | No / decline |
| DUDUNGA (language screen) | Starts the game after UKUNGA |
| Input | Notes |
|---|---|
| Arrow keys | Move |
| Z, Enter, Space | Interact / advance dialogue — face targets from an adjacent tile |
| Shift (hold) | Run — mandatory for the island tunnel chase |
| Esc or X | Pause menu |
- UKUNGA, then pick DUDUNGA on the language screen. English, Japanese, Spanish, Chinese, and Korean branches exist in 1.0 but do not translate dialogue.
- Save in your room: interact with the spot just left of the doorway at (3,1). One shared slot — KOTANGA loads it.
- During a movie, Esc → KOTANGA resumes, UGA UGA skips the video back to the map. During normal play, UGA UGA returns to title. At death, KOTANGA retries from save.
Opening village — first DUDUNGA and ceremony
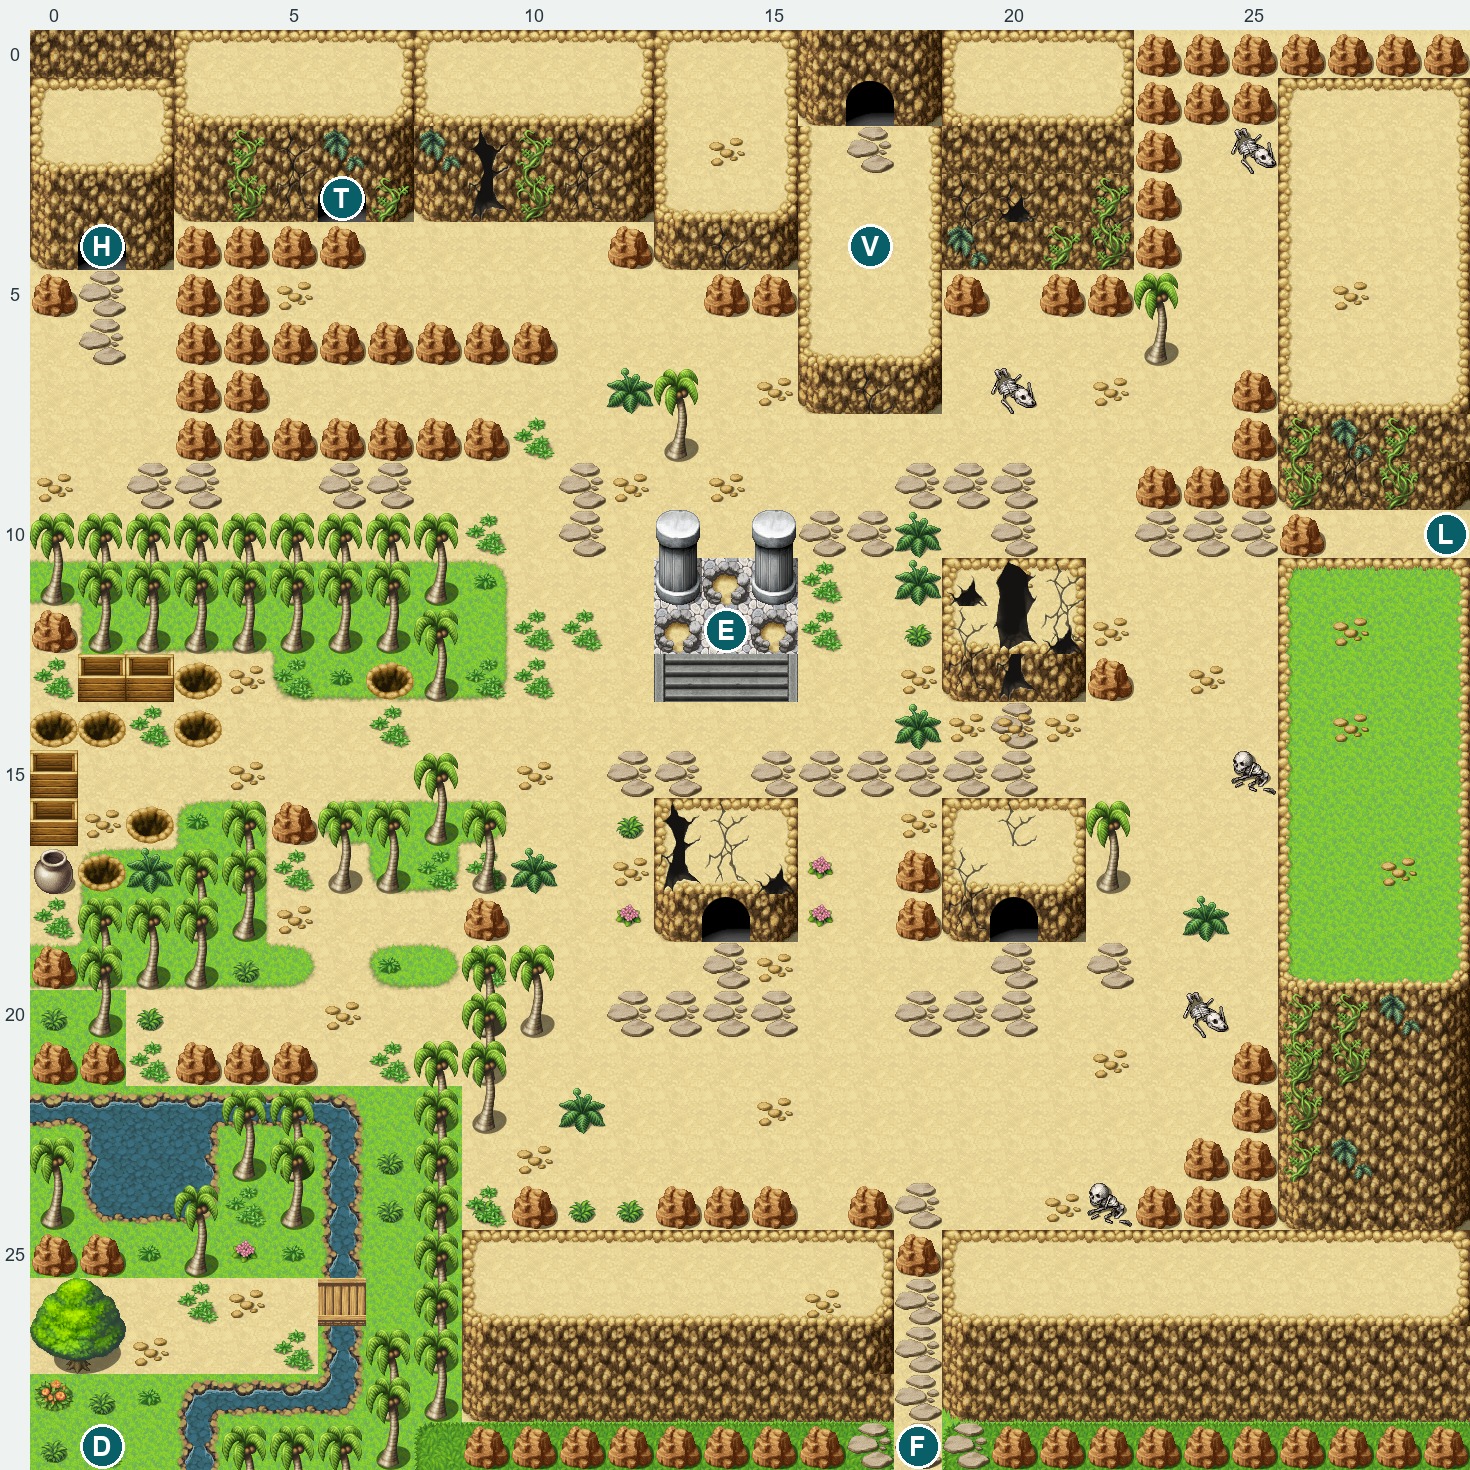
H = home, C = small cave, D = fruit, E = elder.
- Leave your room north. This is the pre-ceremony village layout.
- Enter C at (20,18). Talk to the woman at (2,1) inside — required switch; removes the small dinosaur blocking the first fruit. Other villagers do not set this flag.
- Pick up fruit at D (1,28) — MONGA.
- Offer to E (14,12). Ceremony plays; you wake in your room and the village becomes the main adventure layout.
- Save by the door before heading out again.
Main village — second DUDUNGA and forest access
H = home, E = elder, D = DUDUNGA fruit, F = forest exit.
- Pick DUDUNGA again at D (1,29) and offer to E (14,12). The introductory offering does not count — this is the one that clears the southern boulder at (18,25).
- Save at H.
- South stairs → leave at F (18,29) into the forest.
Next: first rescue (needs FIRE). You can pick KAMONGA in the forest before or after; this route does the rescue first, then the strawberry offering.
Forest — guarded cave (FIRE setup)
T = town entry, K = strawberry KAMONGA, S = save, G = guard, N = helper, R = cave entrance. C = isolated cave exit (not an entrance from town). B = forest rescue boss.
- From T, optionally grab KAMONGA at K (5,3) (MONGA) and hold it.
- Save at S (21,10). Do not touch B yet — you need FIRE.
- Talk to G (32,25) first (knockback + helper flag).
- Talk to N (16,14) after G.
- Return to G, interact again → pass into R (32,24).
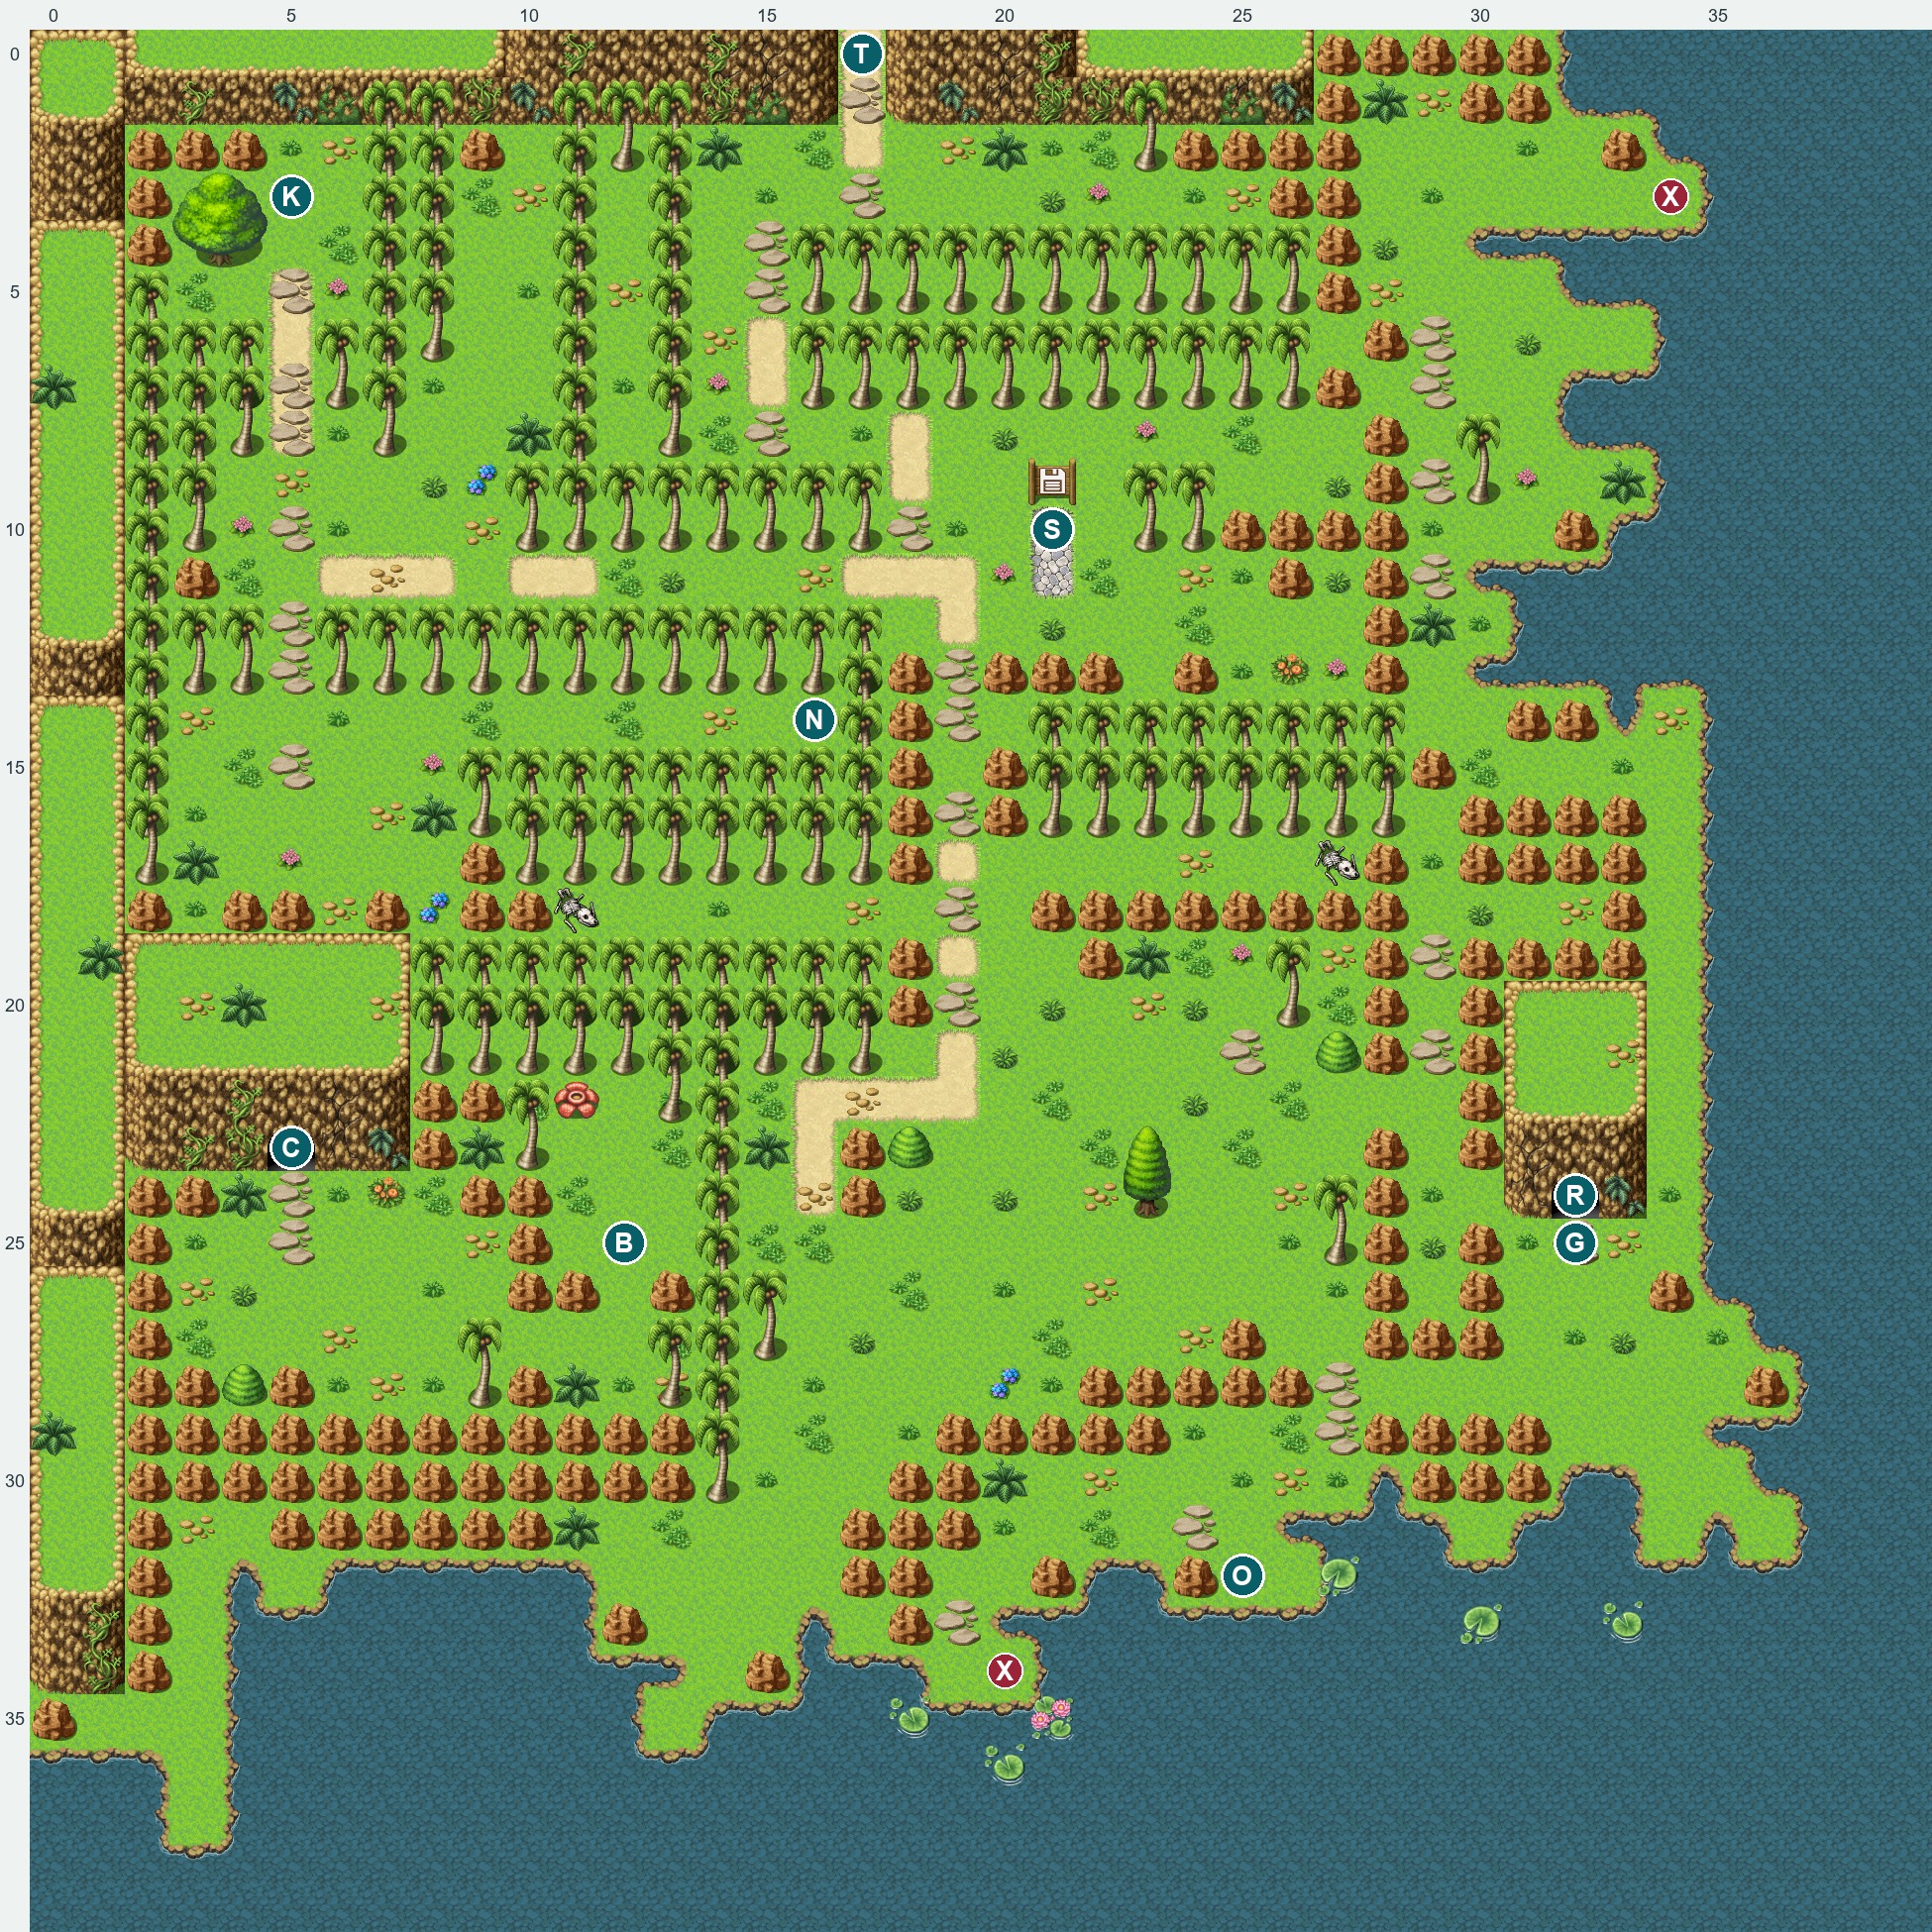
C is only an exit to a side clearing — enter only through R, grab FIRE, leave through C to reach B.
Forest cave — FIRE and first rescue
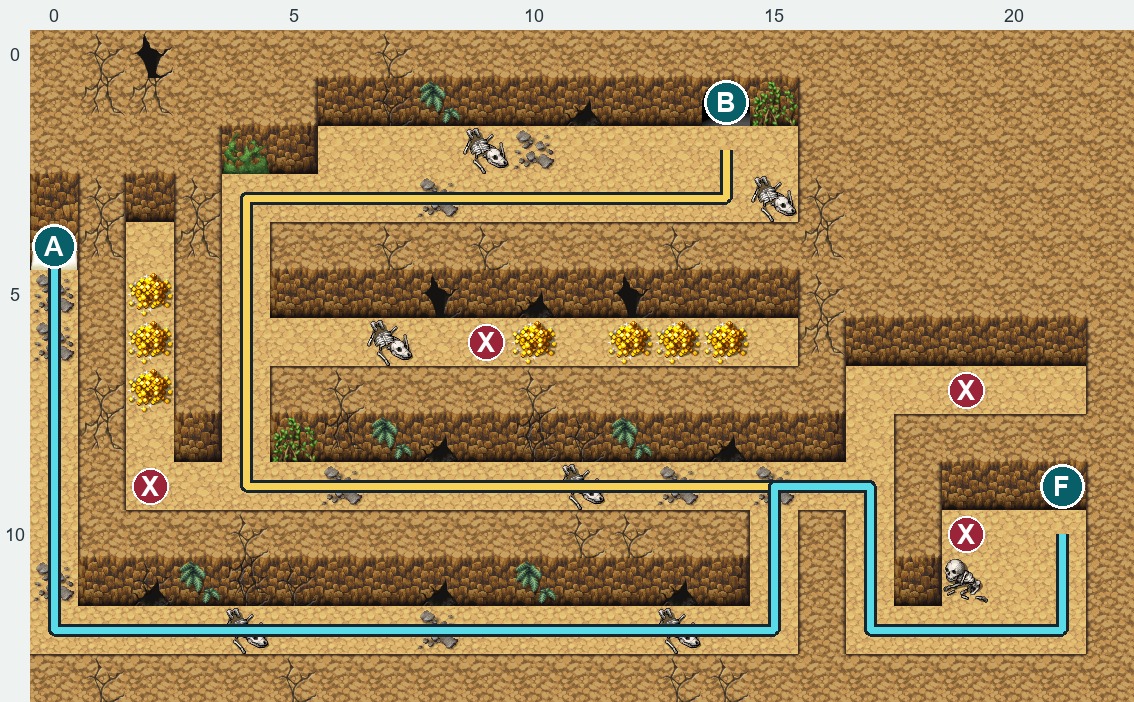
Yellow = path to FIRE (F) at (21,9). Cyan = path to exit A → forest C (5,25). Red X = lethal.
- Inside R, you start near (14,2). Follow yellow on the map: south to row 3, west to column 4, south to row 9, east to column 17; south to row 12, east to column 21, north to row 10. F is one tile north of the route end.
- Interact with F (21,9) for FIRE. Chest (19,10) is a trap; hole (19,7) kills.
- Cyan out: south to row 12, west to column 17, north to row 9, west to column 15, south to row 12, west to column 0, north to A (0,4) → you appear at forest C (5,25).
- With FIRE, go south to row 27, east to column 12, north toward B (12,25). Walk into the guarding dinosaur — FIRE auto-triggers, first girl saved, you return home. Save. Rescue detail.
- Offer KAMONGA to E (14,12) if you have not yet. That unlocks the ocean leg.
Ocean — slingshot island approach
F = forest return, 1 = rescue island, 2 = slingshot island. O = lower embark, U = upper embark, S = save, T = tunnel.
- After first rescue + KAMONGA offering: forest O (25,32) → MONGA to sail. Go to island 2, landing (33,10).
- Save S (11,6) on island 2. Cross bridge south → enter tunnel T (16,15).
- Do not rush rescue island 1 yet — SLINGSHOT is after the tunnel.
Red X on the ocean map = fixed attack triggers; steer around them.
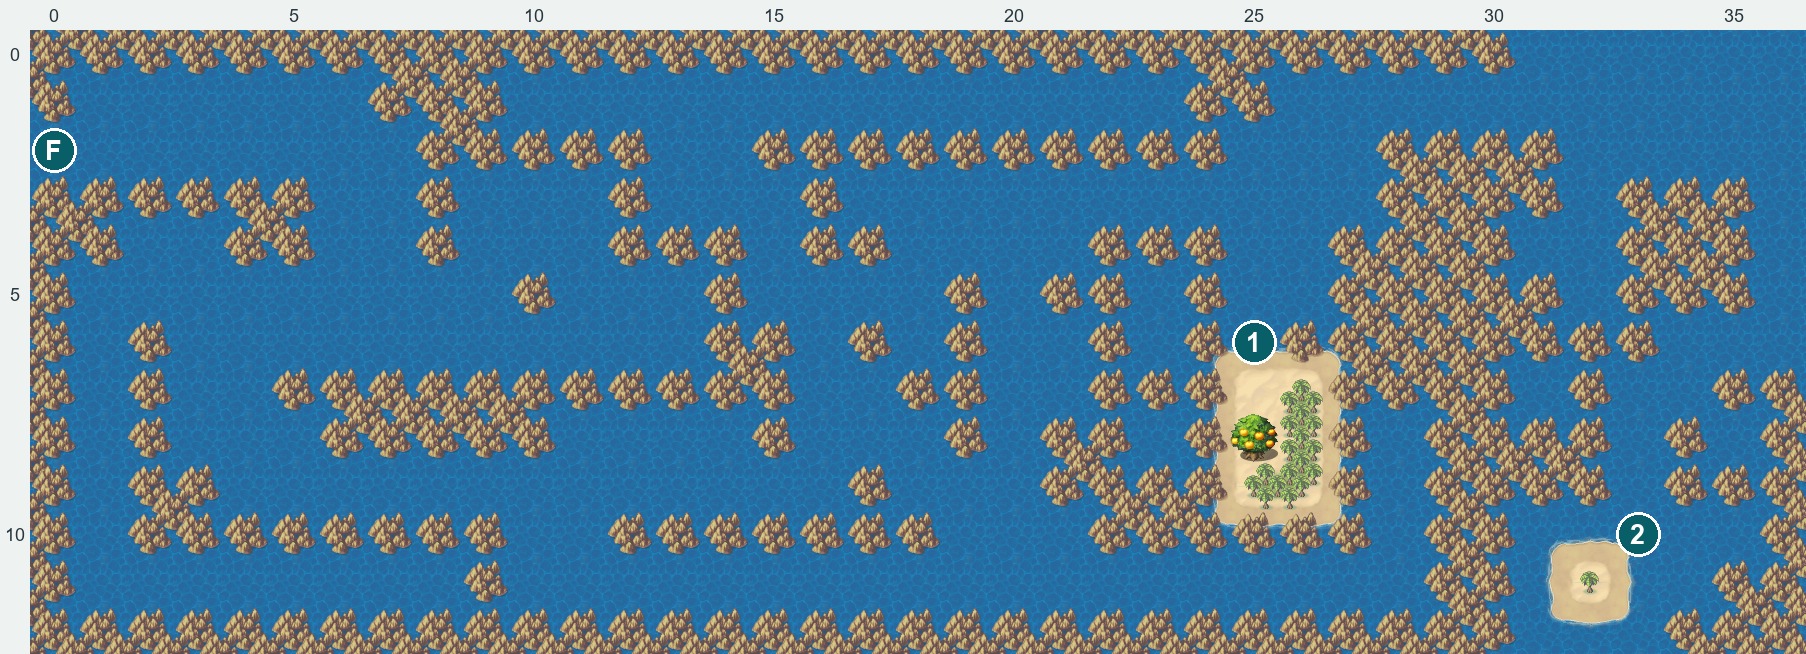
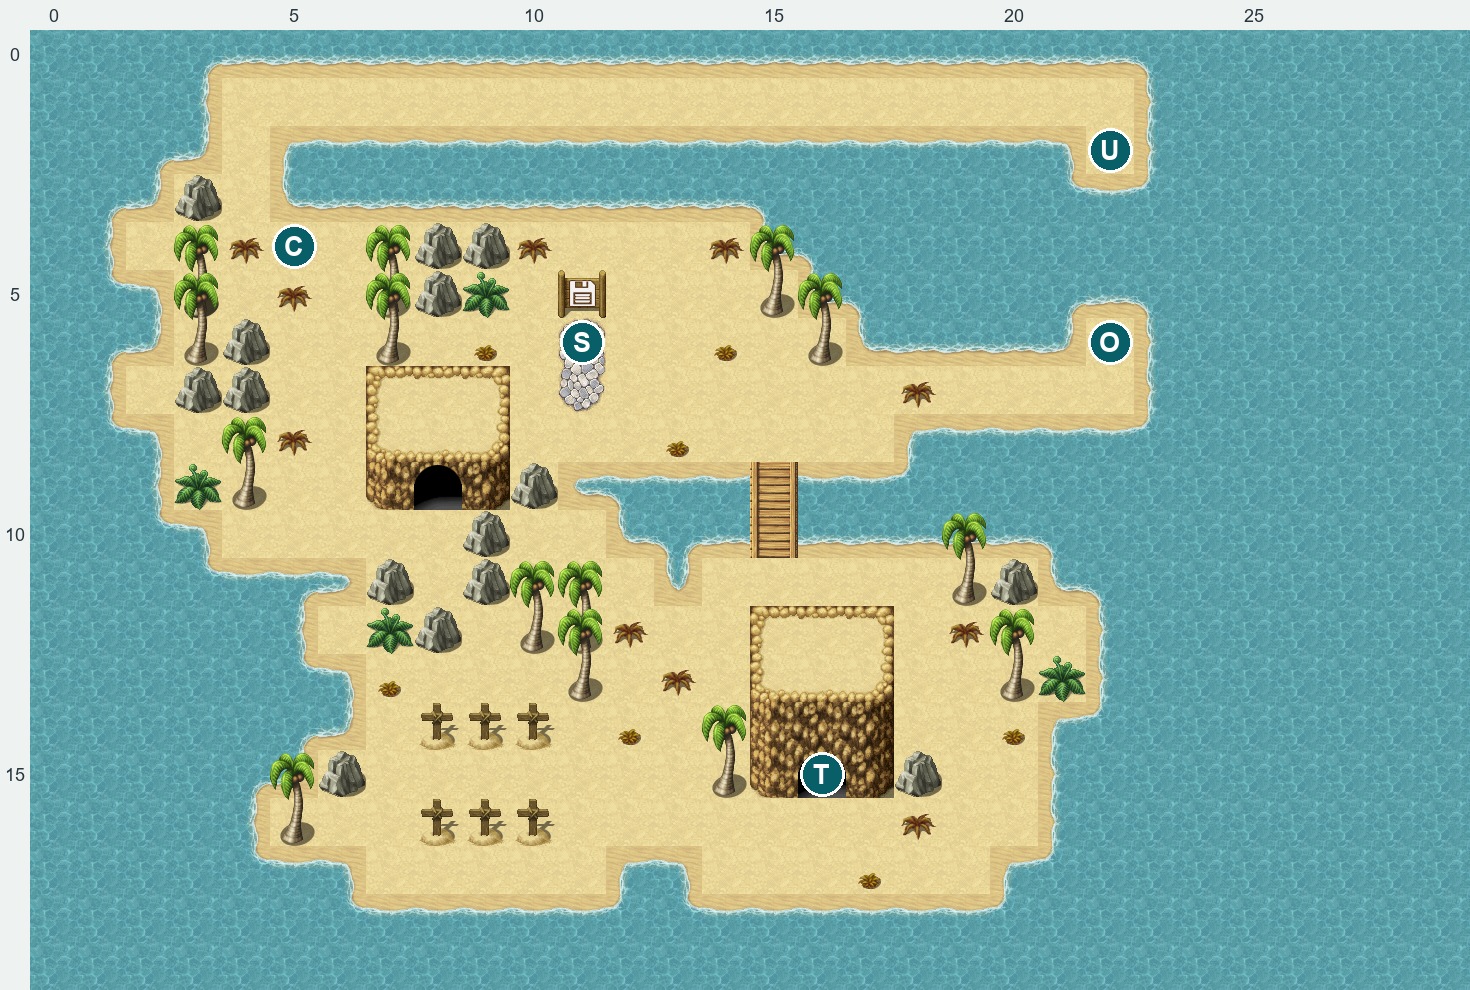
Tunnel chase (hold Shift): Island tunnel chase.
Second rescue — SLINGSHOT and eastern exit
- With SLINGSHOT, land rescue island 1 at (25,6). Touch boss B (6,5) while carrying it — second girl saved, home, save. Do not skip the slingshot chest — girl two warning.
- KAMONGA offering clears the eastern boulder; second rescue removes the blocker at (28,10). You need both for the labyrinth door L (29,10).
- Enter the labyrinth when ready.
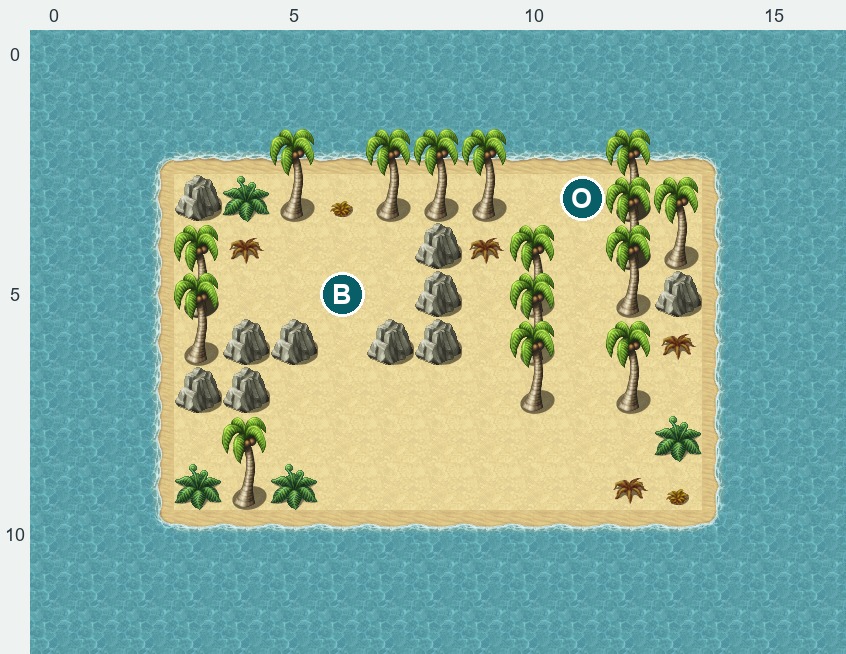
Labyrinth maps: Labyrinth — BANONA and drum route.
Labyrinth — summary
- Pick BANONA at F (27,21) — stand (26,21), face right, MONGA. Save NPC S (20,20) when you can reach them.
- Only safe chest: DRUM at D (41,16). Every other chest and marked hole kills. Do not touch rescue B (27,5) without DRUM.
- Long eastern loop to D, back to B with DRUM → third girl saved → home → offer BANONA to elder → northern boulder (6,4) clears. Girl three.
Trap reference and loop map: Labyrinth routes.
Volcano — guard, helper, final interaction
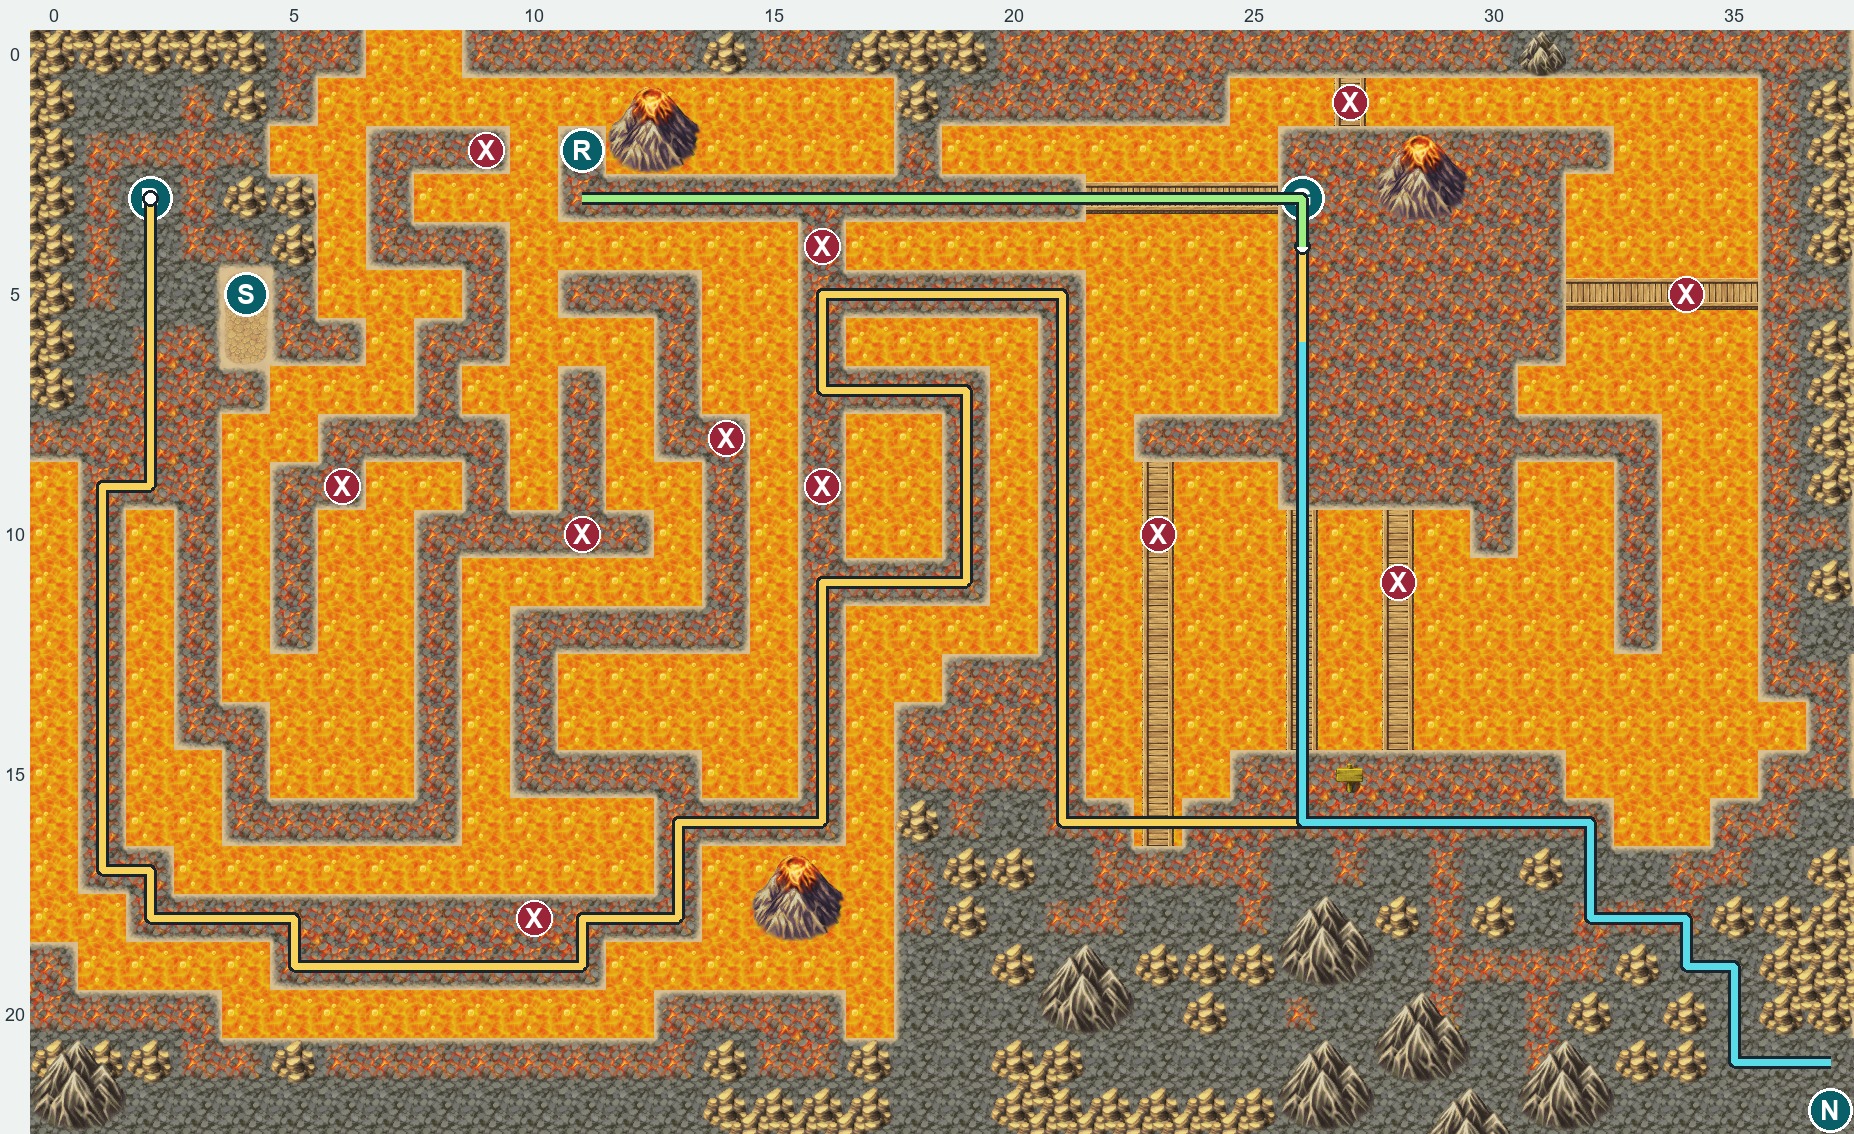
- After BANONA offering: northern tunnel T (6,3) → walk to right-hand exit (13,2) → auto flight to volcano mount. Save S (4,5) on arrival.
- Yellow maze to tile below guard G (26,3). Talk to G (knockback). Cyan to helper N — starts around (37,22); on my run he wandered before I caught him, so the sprite may not sit on the marker. Talk after G flag.
- Return to G, interact again → pass. Green corridor: through G to row 3, west to (11,3), face north, interact R (11,2) → fourth girl / completion and ending. Girl four.
- Back in your room — save if you want the cleared state on disk.
Route checklist
| Phase | Done when |
|---|---|
| Intro ceremony | First DUDUNGA to elder, village upgrades |
| Forest access | Second DUDUNGA offering |
| First rescue | FIRE + forest B |
| Strawberry | KAMONGA to elder |
| Second rescue | SLINGSHOT + island B |
| Third rescue | DRUM + labyrinth B |
| North open | BANONA to elder |
| Fourth rescue / ending | Volcano R interaction |
Stuck? After ending and quick fixes.
Leaf guides
| If you need… | Page |
|---|---|
| Four girls — order, items, slingshot soft-lock | Guide to save the four girls |
| Tunnel chase with Shift | Island tunnel chase |
| Trap list + drum loop map | Labyrinth routes |
| Museum, studio, bonus scene, stuck table | After ending & quick fixes |
Finished Hentai Caveman? Find your next game.
Browse the full library or pick another hub from the homepage.
Browse all game guides →